Introduction:
The main purpose of this article is to guide the industrial IoT(IIoT) community to easily understand how to connect any field devices, sensors, controllers, PLCs, SCADA, DCS, HMI and actuators to the Fogwing IIoT platform using Bivocom TG-451 gateway. Please go through the entire article to capture the steps involved in the configuration of the gateway and Fogwing IIoT platform. If you are facing any issues, you can email our Fogwing support team.
For the purpose of demonstration, the XYMD02 sensor with the TG-451 gateway has been used.
Description:

TG451 Series Gateway is a type of industrial 802.11/b/g/n cellular gateway, which adopts high powered industrial 32 bits CPU, with multi-layer software detection and hardware protection mechanism to ensure reliability and stability of the device. It supports the worldwide carrier 4G/3G/2G cellular network and Wi-Fi network. TG-451 gateway reads data from RS485 sensor and converts it into required form and sends it to Fogwing Platform via the internet.
Pre-requisite:
Step-by-step:
- Create an account & set up Fogwing.
- Configure TG-451 gateway
- Connect XY-MD02 sensor with TG-451 gateway & visualize the data
1. Create an account & setup Fogwing
Step: 1
Please visit https://enterprise.fogwing.net and sign up. You can also watch instructional videos to understand the various features and functions of the platform here. Fill in the registration details as requested and complete the registration process. You will receive an email with a set of instructions and confirmation of account creation within few seconds.

Step: 2
Now you can log in to the platform using your credentials. Once you are logged in, you will land on Fogwing Get Started page, where you can create an Application and fill all the information and submit the form.
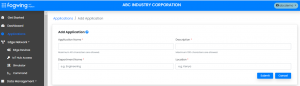
Step: 3
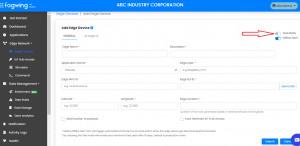
The next step would be creating an edge device. Click on Edge Device and fill in all required information about the TG-451 gateway by choosing the previously created application.
Note: If you enable the Test Mode option, then your data will be deleted after 15 days.
Step: 4
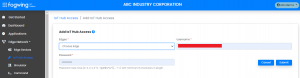
Now, use the IoTHub Access option from the menu and create IoTHub access for your edge. IoTHub access facilitates MQTT access for your edge/gateway. After the successful creation of IoTHub access, you will receive an email with Fogwing IoT Hub access details.
Note: You can automatically create the IoTHub access in the previous step by enabling the Auto Generate IoTHub Access option. In that case, you can skip step 4.
With this step complete, you are now done with the Fogwing setup.
2. Configure the TG-451 gateway
Step: 1
Use Bivocom standard power adapter (1.5A/12VDC) and power up the gateway. If you want to use your own power supply, make sure that the power range is between 5-35VDC and is stable enough. Before powering up make sure that you have connected Wi-Fi and cellular antenna with the gateway.
Step: 2
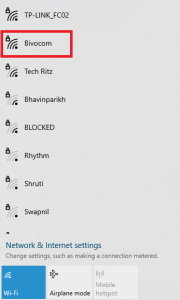
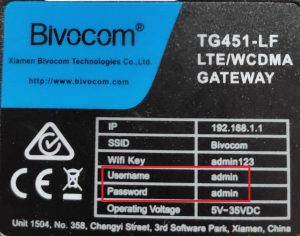
Open your laptop/desktop, search for the TG-451 gateway access point and connect it using default credentials.
SSID: Bivocom
Password: admin123
Step: 3
Open a web browser and go to the gateway’s default IP address: http://192.168.1.1 Use the following credentials to log in.
Username: admin
Password: admin
Default IP address, default SSID and password can be found on the TG-451 gateway.
Step: 4
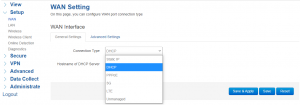
Once you log in to the Bivocom TG-451 web interface. Please go to Setup -> WAN, you will be redirected to WAN Setting page. Under General Setting choose the connection type as DHCP and click on Save & Apply.
Note: If you want to use a cellular network, select 3G or LTE from the dropdown menu. If a cellular network (3G or LTE) is selected, you can skip step 5.
Step: 5
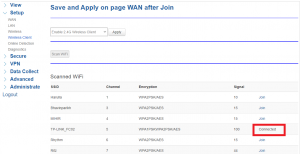
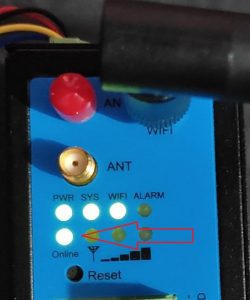
Now go to Setup -> Wireless client, from the dropdown menu Enable 2.4G Wireless Client then click on Apply. Once the setting is applied, the Scan WiFi button will be enabled, click on Scan WiFi. Upon clicking Scan WiFi, all available Wi-Fi networks nearby gateway will display. Choose your Wi-Fi network, click on Join and provide the credentials. Once the gateway is connected to your Wi-Fi network, it will show connected instead of Join. If all steps have been followed, your gateway will be connected to the Internet. To verify please check the Online LED of the gateway, if it is glowing then it is connected to the Internet and if not, please restart your gateway.
Step: 6
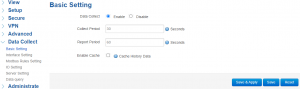
Go to Data Collect – > Basic setting and enable the data collection. Set the Collect Period and Report Period as per your requirement. Collect period is the frequency that the master (TG-451) will ask the slave (XY-MD02) for the data. The report period is the time interval where the data is pushed from the gateway to the Fogwing Platform.
Step: 7
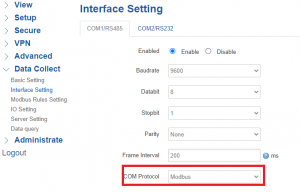
Go to the Data Collect -> Interface setting, enable the COM1/RS485 and change the field information according to your sensor/controller. We have configured it according to the RS485 XY-MD02 sensor. Make sure that you have selected COM Protocol as Modbus.
Step: 8
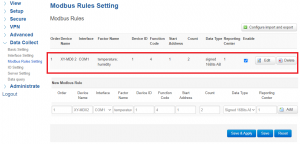
This step is for Modbus configurations. Please go through the datasheet of your sensor to understand the Modbus registries. In our case, we are using an XY-MD02 temperature & humidity sensor.
Go to Data Collect -> Modbus Rules Setting, Create New Modbus Rule and provide all the RS485 information related to your sensor (XY-MD02). Once all necessary information is entered, click on Save & Apply.
Step: 9
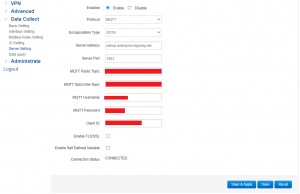
The final step towards the configuration of the TG-451 gateway is the MQTT configuration. Note down the MQTT access credentials provided in the Fogwing account under the menu: IoThub Access -> IoThub Interface Options -> MQTT Access
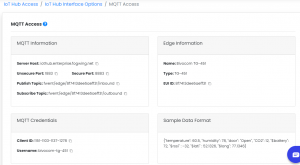
Now go to Data Collect -> Server Setting, enable the server setting and set Protocol as MQTT, Encapsulation Type as JSON, fill Fogwing MQTT credential into it and click on Save & Apply.
Note: Fogwing platform accepts data only in JSON format.
3. Connect XY-MD02 sensor with TG-451 gateway & visualize the data
Step: 1
Now connect XY-MD02 sensor with TG-451 gateway as mentioned below.

Step: 2
After completion of the above steps, provided everything goes in line with the above-mentioned instructions, you will be able to see the data sent over to Fogwing platform.
Now you are ready to visualize your RS485 temperature & humidity sensor data in the Fogwing IIoT Platform portal, you can check all the data in the Data Storage menu.

Note: For detailed visualization of your data please subscribe to Fogwing Data Analytics or reach to our Fogwing Support team
Conclusion
In conclusion, connecting Bivocom TG-451 to the Fogwing Platform is a hassle-free process provided all steps have clearly adhered. It’s a few specifications that are to be set explicitly in order for the device to send data to Fogwing IIoT Platform. With Bivocom TG-451 connected to the Fogwing IIoT Platform, valuable insights from data can be extracted reliably.