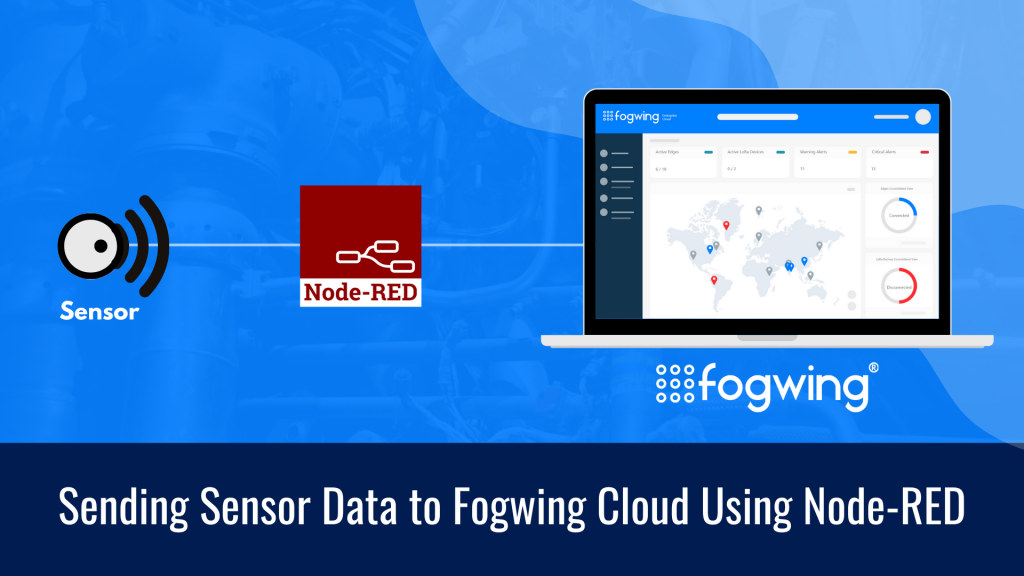
Introduction:
Node-RED is a programming tool for wiring together hardware devices, APIs and online services in new and interesting ways. It provides a browser-based editor that makes it easy to wire together flows using a wide range of nodes in the palette that can be deployed to its runtime in a single click. This guide will tutor you on how to use Node-RED flows to send random sensor data to Fogwing Enterprise Cloud.
Requirements:
- Fogwing Community Subscription.
- Node-RED installed on a computer.
If you are new to Fogwing Platform, explore here.
1. Signing Up to the Fogwing Enterprise Cloud
Step 1:
To create an account in the Fogwing Platform, please head over to this link and press the “Sign-Up” button. Fill in the necessary details and tick the “I agree to Fogwing’s Terms of Use and Privacy Policy” and press the “Sign Up” to create a new account.
Step 2:
Sign in to the Fogwing Platform using your credentials to create Applications. Upon logging in, you will land on the “Get Started” page. From the menu bar, click “Applications”, the Applications page will display. Click the “Add” button, fill all the fields and click on “Submit”.

Step 3:
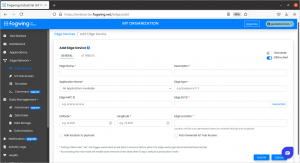
This step involves the creation of Edge. From the menu bar in the Fogwing Platform, click “Edge Network”, and select “Edge Devices”. Edge Devices page will appear. Click the “Add” button, fill all the fields and click on “Submit”.
Step 4:
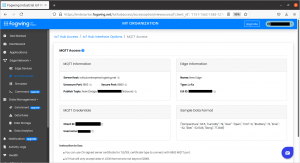
From the menu, click “IoT Hub Access”, the IoT Hub Access page will appear. Click on “Add” button, fill all the required fields and click “Submit”. To see available interface options, click on the eye icon and choose “MQTT Access”. You will see a screen like the one below, these details are useful while setting MQTT details on Node-RED.
2. Creating Node-RED flows.
Step 1:
Download Node JS based on your operating system by heading over to this link. In this guide tutorial, we will be using a computer with Windows OS. Once you have downloaded the package you need to install it by double-clicking on the package.
Step 2:
Open Command Prompt to update the local npm (NodeJS Package Manager). Type the command npm install –g ––unsafe-perm node-red and press enter. Type node ––version && npm ––version command to see the latest version.
Step 3:
Refer the link on installing Node-RED on Windows PC. Once installed you can run it by typing “node-red” on the Command Prompt.
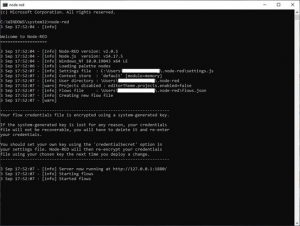
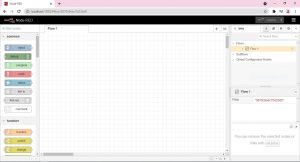
By default, it will run on http://127.0.0.1:1880/ or http://localhost:1880/. You can open up any browser and type this address. You will see a page like the one shown below.
Step 4:
We will require to install few packages before proceeding. Click on the button shown below and select “Manage Palette”.

Move to the Install tab and type “Modbus” and install the package highlighted below.
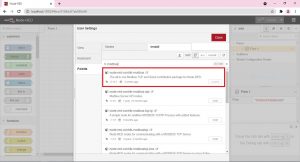
Now, install the node-red-node-random package by following the same step. Using this package, we will generate random sensor data to send it to Fogwing Cloud.
Step 5:
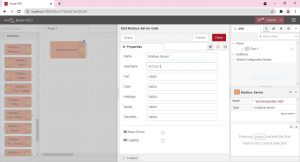
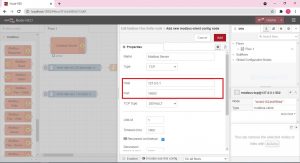
Drag Modbus Server from the list and place it on flows, double click on it and set the server address as below. Click on “Done”.
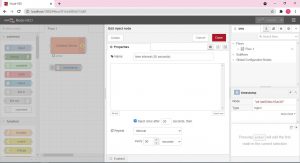
Drag the inject node, double click on it and set the fields as below.
We will use this node to read/write the Modbus payload to or from the Modbus server. We are writing Modbus payload every 1 minute and reading for every 30 seconds. So, create two nodes one with an interval of 1 minute and another one with 30 seconds.
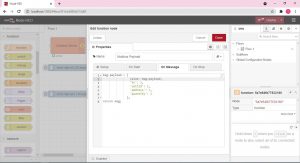
We are using a function node to generate the Modbus payload. Drag the function node to the flow, double click to edit and write a JavaScript code as below.
Drag Modbus Flex Getter into flows and double click on it to edit.
Click on the button shown below to add Modbus Server to which it writes Modbus Payload.
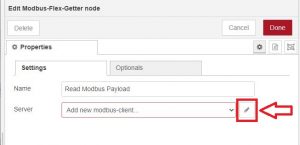
And make the changes shown in the image below. Then, click on Add and click on Done.
We are required to send that payload to Fogwing for every 1 minute. So, add a delay node to the flow and make changes as shown below. Click on “Done”.
Read Modbus Payload will provide data in array format, we need to convert it into JSON to send it to Fogwing Cloud over MQTT.
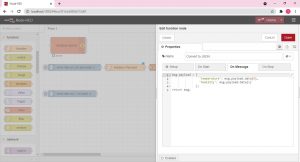
Drag a function node and add a JavaScript code as shown below, then click on Done.
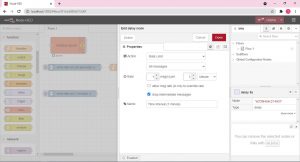
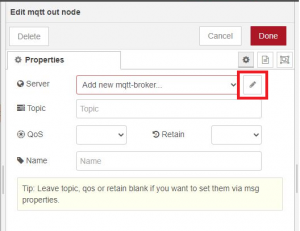
Now, drag the mqtt out node to the flow, double click to add the MQTT Server details. Click the button shown below.
Fill the details as below. You can find these details in the MQTT Access page of Fogwing Enterprise Cloud.
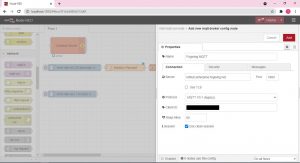
Now, move to the Security Tab and enter the “Username” and “Password”. Click on “Add”. Add the publish topic in the place Topic and select QoS as 0, Retain to false and name it as Publish to Fogwing Cloud.
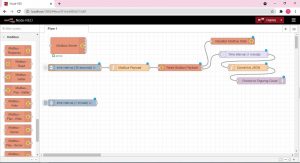
We are ready to connect the nodes. Now, connect them as shown below.
Now, we will learn how to create flows for writing Modbus payload to Modbus Server.
We will write random temperature and humidity data to the Modbus Server in an interval of 1 minute.
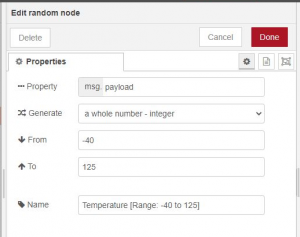
So, drag a random node to the flow and edit it as shown below. This will be our temperature node. We are assuming our sensor will provide a temperature value between -40 and 125 Degree Celsius.
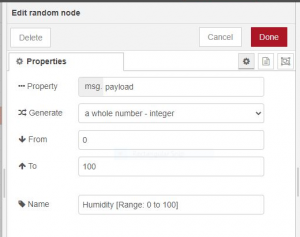
Now for the humidity node drag another random node and edit it as shown below. We are assuming humidity sensor will provide a value between 0 to 100%.
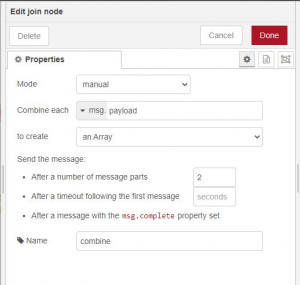
We need to consolidate the temperature and humidity data in a single payload to send it to the Modbus Server.
Drag a join node and edit it as shown below. Then, click on “Done”.
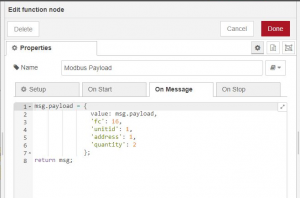
To convert the sensor data into Modbus Payload, we need a function node. Drag a function node to the flow and edit it as shown below. Then, click on “Done”.
This Modbus payload will now be ready to be written to a Modbus Write node. Drag a Modbus Flex Write node, “double click” on it, name it as Write “Modbus Payload” and select the Modbus Server. To visualize this payload, drag the Modbus Response node into the flow and name it as Visualize Modbus Data.
Connect the nodes as shown below to complete.

Now, the entire flow will look like the one below. To make it clearer, we have added a comment node.
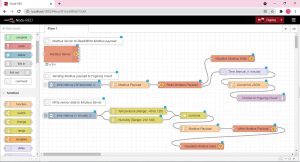
Click on Deploy to save the flow.

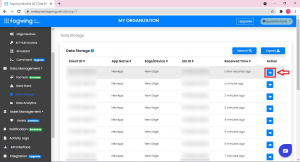
Now, you can visualize the data in the Fogwing Enterprise Cloud by clicking on “Data Storage”. Press the eye icon to visualize the data sent from the Node-RED flow.
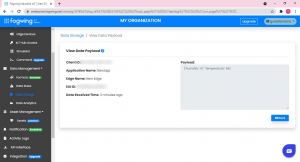
You can see the sensor data sent in an interval of 1 minute. The data will be displayed as JSON payload, shown below.
To stop the Node-RED flow at any time move to the Command Prompt window and press Ctrl+C to stop the flow. Press on “y” and then press Enter when prompted to terminate the process.
Conclusion:
In conclusion, sending sensor payload to the Fogwing Enterprise Cloud using Node-RED is fairly a simple process. Follow the steps given in this guide tutorial properly to make the Node-RED flow, work seamlessly.